Friendship Bracelet Turned Watch Strap
As I was diligently working on my friendship bracelet, my boyfriend looked over admiringly and asked if I could make a "boy version" for him to wear. Hmm... it would have to be longer, thicker, wider, and use "boy colors," which all = more work! But it seemed like a challenge and I love crafty challenges, so I went to the store and found the colors that the boyfriend requested and went to work. After a few rough starts, I figured I would add more "challenge" to my project and turn a simple friendship bracelet into a watch strap - what was I thinking?!? As it turns out, it's not entirely too bad but it does take some a LOT of time.
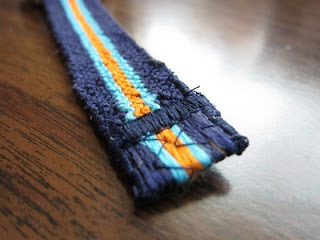
Sneak peek:

So if you read my previous post on how to make a friendship bracelet, you will see that the bracelet has nice diagonal lines and most online tutorials show you how to make the striped diagonal and V shapes... but, for a man's watch strap, I wanted VERTICAL stripes down the center of the watch like the ones they have at J.Crew. The challenge was to figure out how to do it.
After many trials and errors ARGs and WAHs!, I will attempt to explain the process to you so you don't have to go thru what I did. ;)
STEP I: Materials + Prep
- watch buckle (I bought a 22mm (7/8")to go with the width of this strap. You can buy here)
- embroidery string (36 inches or longer)
- matching thread color and sewing machine
- grosgrain ribbon for backing
- gel glue + clear tape
1) First, you will need embroidery thread/floss. For this 1 inch wide piece, I used 16 strands of floss (36 inches long) in this pattern: 4 #823 dark navy blue, 2 #481 turquoise, 4 #971 pumpkin, 2 #481 turquoise, 4 #823 dark navy blue
 *NOTE: it's easier to work with even numbers of floss because everything is tied in pairs.
2) Next, tie one end into a loose knot and secure it to a clip board, pin it to a pillow, or tape to a firm surface.

STEP II: Tie away!
There are two different run-thrus which you will repeat over and over again.
1) First Run-thru: start on the left and pair off the strings. Make 2 Left over Right knots with each pair until you reach the middle. When you get to the middle, you want to make 2 Right over Left knots with the remaining pair because they are on the right side. You will always make LoR knots with the string on the left and RoL knots when you're working with the string on the right. Remember to do each knot TWICE.

2) Second Run-thru: on the second run-thru, you're going to be joining the previous pairs of floss together. You'll want to omit the left and right most string and pair off the rest of the string. You are still doing two knots for each pair but they will alternate between LoR and RoL, depending on which side you're starting from. For each pair on the left, you will start with the LoR knot but then switch to RoL for the second knot. When you reach the middle, you will start with the RoL knot and then make a LoR knot. confused? Try figuring this out on your own! haha!

ok, and that's it for the tying knots section. you will repeat these steps alternating between the first run-thru and the second run-thru.
STEP III: Watch strap time
Untie the large loose knot at the very beginning. Pin the grosgrain ribbon to the back of your friendship bracelet and sew small zig-zag stiches on the edges to secure.
Use gel glue to secure the string ends neatly and fold back. Sew secure with the largest zig-zag stitch on your machine where the friendship bracelet ends and the loose string begins. Use a much smaller zig-zag to secure the edges to the end. *TIP: if your machine is getting caught on the loose strings, place some clear tape on the strings and that should help.
On the other loose end, you will need to fold back all of the strands and make a loop and sew that securely to the back of the strap. Adding the buckle/watch clasp takes a little finagling; just make sure it's all facing the right way!


Sneak peek:

So if you read my previous post on how to make a friendship bracelet, you will see that the bracelet has nice diagonal lines and most online tutorials show you how to make the striped diagonal and V shapes... but, for a man's watch strap, I wanted VERTICAL stripes down the center of the watch like the ones they have at J.Crew. The challenge was to figure out how to do it.
After many trials and errors ARGs and WAHs!, I will attempt to explain the process to you so you don't have to go thru what I did. ;)
STEP I: Materials + Prep
- watch buckle (I bought a 22mm (7/8")to go with the width of this strap. You can buy here)
- embroidery string (36 inches or longer)
- matching thread color and sewing machine
- grosgrain ribbon for backing
- gel glue + clear tape
1) First, you will need embroidery thread/floss. For this 1 inch wide piece, I used 16 strands of floss (36 inches long) in this pattern: 4 #823 dark navy blue, 2 #481 turquoise, 4 #971 pumpkin, 2 #481 turquoise, 4 #823 dark navy blue

2) Next, tie one end into a loose knot and secure it to a clip board, pin it to a pillow, or tape to a firm surface.

STEP II: Tie away!
There are two different run-thrus which you will repeat over and over again.
1) First Run-thru: start on the left and pair off the strings. Make 2 Left over Right knots with each pair until you reach the middle. When you get to the middle, you want to make 2 Right over Left knots with the remaining pair because they are on the right side. You will always make LoR knots with the string on the left and RoL knots when you're working with the string on the right. Remember to do each knot TWICE.

2) Second Run-thru: on the second run-thru, you're going to be joining the previous pairs of floss together. You'll want to omit the left and right most string and pair off the rest of the string. You are still doing two knots for each pair but they will alternate between LoR and RoL, depending on which side you're starting from. For each pair on the left, you will start with the LoR knot but then switch to RoL for the second knot. When you reach the middle, you will start with the RoL knot and then make a LoR knot. confused? Try figuring this out on your own! haha!

ok, and that's it for the tying knots section. you will repeat these steps alternating between the first run-thru and the second run-thru.
STEP III: Watch strap time
Untie the large loose knot at the very beginning. Pin the grosgrain ribbon to the back of your friendship bracelet and sew small zig-zag stiches on the edges to secure.

Use gel glue to secure the string ends neatly and fold back. Sew secure with the largest zig-zag stitch on your machine where the friendship bracelet ends and the loose string begins. Use a much smaller zig-zag to secure the edges to the end. *TIP: if your machine is getting caught on the loose strings, place some clear tape on the strings and that should help.
On the other loose end, you will need to fold back all of the strands and make a loop and sew that securely to the back of the strap. Adding the buckle/watch clasp takes a little finagling; just make sure it's all facing the right way!

Lastly, sew on the grosgrain ribbon on the back to cover up all the loose ends and ugliness. You're done!!! ;D YAY!!!


Comments
Post a Comment