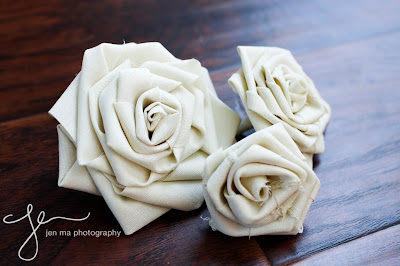
DIY: Wedding Flower Hair Clip
These flower hair clips adorned my little flower girls at my wedding and totally completed their outfits! Of course, you do not have to make these just for weddings - any day is a good day to wear flowers in your hair! ;)

Materials:
- paper to make pattern
- fabric for flower (1/2 yd is plenty - you want a fabric that is "fluffy & bouncy")
- sturdier fabric for base or felt (umm... like at least 5"x 3")
- fabric scissors (sharp ones!)
- sewing pins
- hot glue gun
Directions:
First of all, the fabric I'm using for this wedding version is a beautiful sparkly smooth stiff chiffon type fabric. It's not as rough as tulle but it's holey like tulle, and not as floppy as chiffon. Anyone know the name of this type of fabric - please let me know in the comments below - I rhyme!
Step 1: Draw a 5 petal shape flower paper pattern (see image below)
*Note: Depending on what size flower you want, you just make a pattern that size + about a 1/4 inch.
Ex. For a 3 inch diameter flower, I would make a 3 1/4" diameter pattern (that's the size I used).
Step 2: Tape the pattern to your fabric and cut out 13 petal pieces. You can also fold your fabric and cut 2 or 3 at one time to save time. ALSO cut out your base pieces at this time. Cut two circles. One about 1/2 inch smaller than your flower pattern and another smaller circle the length of your hair clip. (see image below)

Step 3: Fold all 13 of your petals into fourths and straight pin them in place (see image #1 + 2 below). Roll the last one up and pin that in place (see #3 in the image below). So you should have 12 #2 pieces and one #3 as the center of your flower.

Step 4: Now the FUN PART! Take your larger circle and start gluing petals onto it. There will be 3 layers as specified below. I like to use the straight pins to hold the petals in place until the glue is almost dried before I pull them out. They're also great to use so you don't burn your fingers! aHA! ;)
*Note: The bottom layer petals will also slightly overlap each other which is purposeful since you are trying to hide the base circle.

Almost there! This is an optional step but if you want to snaz up your hair clip, cover it with ribbon first before you attach it to your flower. It makes the hair clips look more finished. (Thanks to my bestie, Steph for doing mine for me. hehe)

Step 5: Lastly, glue your hair clip "upside down", sandwiched between the larger and smaller circles.


Materials:
- paper to make pattern
- fabric for flower (1/2 yd is plenty - you want a fabric that is "fluffy & bouncy")
- sturdier fabric for base or felt (umm... like at least 5"x 3")
- fabric scissors (sharp ones!)
- sewing pins
- hot glue gun
Directions:
First of all, the fabric I'm using for this wedding version is a beautiful sparkly smooth stiff chiffon type fabric. It's not as rough as tulle but it's holey like tulle, and not as floppy as chiffon. Anyone know the name of this type of fabric - please let me know in the comments below - I rhyme!
Step 1: Draw a 5 petal shape flower paper pattern (see image below)
*Note: Depending on what size flower you want, you just make a pattern that size + about a 1/4 inch.
Ex. For a 3 inch diameter flower, I would make a 3 1/4" diameter pattern (that's the size I used).
Step 2: Tape the pattern to your fabric and cut out 13 petal pieces. You can also fold your fabric and cut 2 or 3 at one time to save time. ALSO cut out your base pieces at this time. Cut two circles. One about 1/2 inch smaller than your flower pattern and another smaller circle the length of your hair clip. (see image below)

Step 3: Fold all 13 of your petals into fourths and straight pin them in place (see image #1 + 2 below). Roll the last one up and pin that in place (see #3 in the image below). So you should have 12 #2 pieces and one #3 as the center of your flower.

*Note: The bottom layer petals will also slightly overlap each other which is purposeful since you are trying to hide the base circle.
Bottom: 5 petals
Middle: 4 petals
Top: 3 petals + center rolled up piece

Almost there! This is an optional step but if you want to snaz up your hair clip, cover it with ribbon first before you attach it to your flower. It makes the hair clips look more finished. (Thanks to my bestie, Steph for doing mine for me. hehe)


Here's what it looks like from the back all finished!

And on my adorable flower girls!

If you would like to see how to make this pretty banner, click here.
Happy gluing + flower making! :)

Comments
Post a Comment