Flower Girl Banner
I got married this past weekend [insert BIG GRIN here]!!! So needless to say, I have been a wee bit busy lately. HAHA! I had such a good time making all of the little details for my wedding and I am thrilled to share and document it here for all of you. SO here goes...
I was hunting all over the internet for cute banners to purchase, but I couldn't find any of the specific shape I wanted. I realized that I had a banner theme going throughout my wedding - invitation, cake topper, and program - so I knew that in order to get the exact same shape, I would have to make it myself. SOoo... I went to the craft store and picked up a piece of cotton linen fabric from their scrap section. OK, to be honest, I have no idea what kind of fabric it was, but I do know it was "iron-able" and that's the important thing!
 Materials:
- ribbon for handles
- iron safe fabric (about 3 ft long x 2 ft wide)
- medium interface (the same size as your fabric)
- sewing machine, fabric scissors, & iron
- marker to write personalized message;
- acrylic or fabric paint
Directions:
Step 1: Sketch out your template onto scratch paper to the exact length and width that you want. Think about the size of the girls holding the banner. I had two 4 yr. old girls so it didn't need to be too long. See pic below of them holding the banner... so ADORABLE!!!
 Step 2: Trace the pattern onto the interface. Making sure that the interface is folded in half (shiny-sticky side together). Cut out the pattern. You should have two pieces.
Step 3: Iron both interface pieces onto the fabric, making sure they're not touching because you will need to cut the banner 1/4 inch LARGER than the interface.
Step 4: Place the banner RIGHT sides together and sew along the interface, NOT on the interface. Remember to pin the RIBBON handles in place before you start sewing. Leave about 6 inches open at the bottom center to flip the banner right side out.

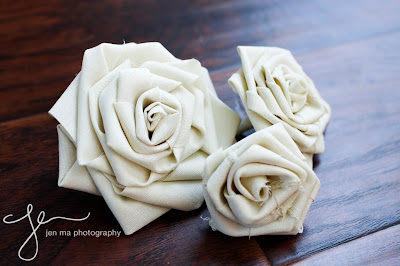
 Step 6: Outline the banner with paint and write your message in the center with a permanent marker. I used a black Prisma Color marker and it made beautiful letters. Decorate with flower clips (click here to see how to make these adorable hair clips).

I was hunting all over the internet for cute banners to purchase, but I couldn't find any of the specific shape I wanted. I realized that I had a banner theme going throughout my wedding - invitation, cake topper, and program - so I knew that in order to get the exact same shape, I would have to make it myself. SOoo... I went to the craft store and picked up a piece of cotton linen fabric from their scrap section. OK, to be honest, I have no idea what kind of fabric it was, but I do know it was "iron-able" and that's the important thing!

- ribbon for handles
- iron safe fabric (about 3 ft long x 2 ft wide)
- medium interface (the same size as your fabric)
- sewing machine, fabric scissors, & iron
- marker to write personalized message;
- acrylic or fabric paint
Directions:
Step 1: Sketch out your template onto scratch paper to the exact length and width that you want. Think about the size of the girls holding the banner. I had two 4 yr. old girls so it didn't need to be too long. See pic below of them holding the banner... so ADORABLE!!!

Step 3: Iron both interface pieces onto the fabric, making sure they're not touching because you will need to cut the banner 1/4 inch LARGER than the interface.
Step 4: Place the banner RIGHT sides together and sew along the interface, NOT on the interface. Remember to pin the RIBBON handles in place before you start sewing. Leave about 6 inches open at the bottom center to flip the banner right side out.

Step 5: Flip the banner right side out and flatten out the corners with a chopstick (or whatever long and pointy thing you have lying around) so that the edges are crisp. Hand stitch the banner closed at the bottom.

How adorable are these flower girls?!? The flower clips are removable so it can be worn in their hair too!

Happy Sewing! :)

Comments
Post a Comment